blame it on my asian genes >> clutter tendencies >> lost camera battery >> no pictures for blog! thank goodness for brothers and boyfriends who have extra cameras to borrow haha.
i recently took an order for 50 cupcakes for a baby christening. little baby zane - he's a cutie! his mom requested lemon cake with lemon buttercream & chocolate with chocolate ganache.
the lemon was pretty easy, just the magnolia vanilla recipe with 2 lemons grated into the batter and one lemon grated into the buttercream. it turned out nice and light, although next time i think it could use a little lemon exract for some punch.
chocolate ganache makes me nervous because that last time i attempted it for the 50 baby shower cupcakes, i had to throw away two batches. why? because 1) i didn't let the cupcakes cool long enough and 2) when you pour the boiled cream into the chocolate, you have to let it sit for a minute before you stir. rushing on either of these two steps will result in a chocolatey goo that won't stick to your cake - it will just drip right off.
here's the recipe for chocolate ganache. it seems intimidating, but personally i think it's alot easier to frost cupcakes with chocolate ganache then buttercream!
Chocolate Ganache
1/2 c whipping cram 4 oz chocolate
Place chopped chocolate in a heat proof bowl. Bring cream just to the boil and pour over chopped chocolate. Allow to sit for 1 minute before mixing until smooth. Can be reheated as needed. If the ganache splits, looks grainy or oily, stir in milk in teaspoons to restore.
it was my first time working with fondant, and I also made some fondant cutouts, which decorated with brushstrokes & edible glitter (which you paint on with vodka!) i wish i had more time, i would have made more cutouts and angels.
I helped host a Great American Bake Sale at work with all proceeds going to Share Our Strength, a charity to help fight childhood hunger in the US. It was so much fun, even more then I expected, and we raised $1400 in one week! Co-workers were very generous with donating their baked goods, and eating too. We were sold out in minutes almost every day. Above is a pictures of some of the baked treats we had on Tuesday.
The giant cookies are Tartine Oatmeal Chocolate Chip Walnut Cookies. The recipe orginated from the famous bakery in the Mission District of San Francisco, so famous the line stretches out the door on Sunday mornings. It's currently my top favorite chocolate chip cookie recipe with a unique nutty flavor and amazing texture - I highly recommend it! (link takes you to the recipe)
I also made these "hamburger cupcakes" below out of white and chocolate cake, with colored buttercream for the mustard & ketchup, and green fruit roll up for the lettuce. As usual, it was more work then I expected, cutting all those tiny mini cupcakes in perfect halves...
Ahhhh, red velvet, it's everybody's favorite. And I didn't make it for years because I didn't know the big fuss. And I was afraid of red dye.
But last week, I finally lost my red velvet virginity. And boy was it memorable. I get it now. A good red velvet has a hint of tang, a faint aroma of cocoa, and just sweet and sour enough cream cheese frosting.
I lost the battery to my digital camera and haven't been able to take photos for weeks. So sad as I have made at least 3 batches of cupcakes since then. One of them was for a baby shower. I made little bird nests and got bored with those, so made little baby booties, rattles and safety pins with buttercream. They were displayed very well given the variation in designs (I tried to tie them altogether with the theme colors - orange & teal.)
Close up shot of the baby bird cupcake:
And I also made a diaper cake for the baby, Dylan, whose sex was still undetermined!
You can learn about how to make these cupcakes from Martha Stewart.
What is Furikake? a) A furry mammal that is cousin to the panda and koala b) A modified form of karate c) An expletive used to express hunger d) Any dry Japanese condiment meant to be sprinkled on top of rice. e) The name of my dog
If you answered (d), you are a Japanese culinary whiz! According to Wikipedia, “Furikake (振り掛け/ふりかけ ?) is any dry Japanese condiment meant to be sprinkled on top of rice. It typically consists of a mixture of dried and ground fish, sesame seeds, chopped seaweed, sugar, salt, and monosodium glutamate. Other flavorful ingredients such as katsuobushi (sometimes indicated on the package as bonito), salmon, shiso, egg, vegetables, etc. are often added to the mix.”
Added to chex cereal and a sugary syrup solution, furikake creates a party in your mouth - the sweet and salty, chewy and crunchy combination makes for the perfect afternoon snack.
Here is a photo of the Furikake I use to make Furikake Chex.
FURIKAKE CHEX RECIPE
You will need: • 2-9x13 pans • 2 large spoons or spatulas for mixing
Dry Ingredients • 1 jar of furikake (see photo – available in asian supermarkets) • 8 cups of cereal (choose a few from the following: rice chex*, corn chex*, wheat chex*, crispix, pretzels, pretzel sticks*, bugles*, japanese rice cracker mix*, honey comb, peanuts* and other nuts. I usually use 1 c each of the asteriked items, except for Japanese crackers and wheat chex which I use 2c, and peanuts only 1/2c)
Sauce Ingredients • 1/4 c Karo's light corn syrup • 1/2 c sugar • 1/4 c vegetable oil • 1/4 c melted butter • 1 T soy sauce (or two packets take out soy sauce)
Directions 1. Preheat oven to about 215 degrees 2. Mix all cereal ingredients in giant pot or tub. Spread in an even layer on 2 trays. 3. Generously sprinkle furikake evenly over cereal on tray. 4. Mix and bring the sauce ingredients to a boil in a small pot. Do not overboil. Turn off heat. 5. Immediately pour half of sugar sauce on Tray 1. Set pot back on stove to stay warm. Using your two spatulas or spoons, fold and toss cereal on tray to evenly coat cereal mixture. Do this quickly. 6. Returning to sugar mixture that is kept hot on stove and give it a good stir. Repeat Step 5 on Tray 2. 7. Bake on middle rack for at least 1-2 hours at 215 degrees, or until crispy, mixing every 30 minutes. 8. Cool before serving.
Furikake Chex will keep fresh if kept in airtight container for several months. Do not make more than double the recipe, since the sugar mixture cools very quickly.
This blog entry is dedicated to MS, teacher of Furikake Chex & originator of my modified recipe above. And to WH who loves to eat Furikake Chex and thus inspires me to make it more than once a year.
I've always been intimidated by floral cream decorations, but with the upcoming birthday brunch I was having for my dear friend G, I decided it was time to get over those fears. Homework: Read up on buttercream flowers in Cake Art by the Culinary Institute of America. Watch "A Cupcake Bouquet" youtube clip from the Culinary Institute of America
For the cake, I used the Magnolia Vanilla Cupcake recipe, using soy milk instead of whole milk(because I didn't have any.) The cake was very moist and fragrant, but a bit sweet for my liking. I think next time I will cut back on the sugar.
For the frosting I used my own buttercream recipe. I made one batch dyed yellow and left one white. Here is the result of my first buttercream flowers. What I learned is that you should make sure the buttercream is chilled just a little so your flower petals don't fall flat. And practice makes perfect!
At the Sundance Film Festival this year, I managed to accidentally talk my way into a VIP party for Def Jam records. (I saw people holding Coffee Bean and Tea Leaf coffee cups outside, asked where they got it and was allowed in to get some!) They were giving away all type of fun swag, including baked goods from Blackbird Bakery - a specialty bakery shop in Texas that makes gluten free goodies. I fell in love with their millet power bars, made of organic puffed millet and organic puffed brown rice, organic dried cherries and blueberries, and sliced almonds. You can order from their website.
Thank you to Karen Morgan for inspiring me to make these healthier alternative to rice krisy treats!
Kashi Krispy Treats
Ingredients 1/2 stick butter or margarine 1 package marshmallows 1 box Kashi Go Lean cereal with 1 c rice krisy cereal 1 cup mixed small dried fruit (I used 1/2 blueberries & 1/2 cranberries, but you can also use raisins, cherries, or cut up apricots. Just make sure they are small bits) 1/2 c slivered toasted almonds
Directions 1. In large saucepan melt butter over low heat. Add marshmallows and stir until completely melted. Remove from heat. 2. Add the cereal. Add the dried fruits and nuts. Stir until well coated. 3. Using buttered spatula or wax paper evenly press mixture into 13 x 9 x 2-inch pan coated with cooking spray. Cool. Cut into 2-inch squares. Best if served the same day.
Well, it's been a while since I've baked anything (two weeks!). So I'll just blog a little about a question that I get asked alot - "How do you make those perfect swirls?"
It looks difficult, but mastering the frosting swirl is actually quite simple. All you need is some practice and a pastry bag or pastry gun. A pastry gun is a better tool when you are making the big cupcake swirls, but a pastry bag offers more control for detailed decorating. The pastry gun that I have is from Williams-Sonoma. I actually recommend researching other brands, because this one was kind of pricey, and also has a problem where the frosting gets lodged in the plastic.
There is a Wilton one at Bed Bath and Beyond, but you can also try Sur La Table. Happy decorating!
I hosted a small birthday brunch for my BFF and cupcake cheerleader L at her house this past weekend. Having already made her favorite - lemon cake - at her baby shower last year, I opted to try a new flavor, strawberry, which to my delight was a success.
You can see that the batter was super sticky - I thought I had over mixed and it was gonna turn into chewy goo, but I think the batter is supposed to be like that with all that yogurt in it. The cupcakes by themselves didn't look too exciting, but it was the vanilla buttercream that really brought out the essence of the berries. It tasted like a strawberry creamsicle. YUM!
You can do it too, though I recommend waiting for strawberries to be in season, as they were a a bit pricey and also very tart.
1/2 cup sugar 1/4 cup (1/2 stick) unsalted butter 1 large egg 6 ounces Dannon® All Natural Vanilla Lowfat Yogurt (or any other fruit flavor of yogurt) 1 tsp. vanilla extract 1 1/2 cups all purpose flour 1 1/2 tsp. baking powder 1/4 tsp. kosher salt 1/4 tsp. baking soda 1/2 cup fresh strawberries, diced
Frosting: 1 stick butter 1 cup powdered sugar 2 fresh strawberries, about 2 Tbsp. mashed
1. Preheat oven to 350 degrees. Line a muffin tin with paper liners. With an electric hand mixer, beat the sugar and butter until light and fluffy. Add the egg, Dannon® All Natural Vanilla Lowfat Yogurt and vanilla, blending until smooth.
2. Measure the dry ingredients into the bowl and blend, then fold in the strawberries.
3. Divide the mixture equally between the 12 paper-lined cupcake cups. Bake for 20-25 minutes or until cake tester comes out clean.
4. Beat together butter, powdered sugar, and mashed strawberry in medium-size bowl until creamy and smooth. Chill frosting for 15 minutes or until thick. Frost cupcakes with a spatula. Keep cupcakes in the refrigerator loosely covered. Yield: 12 servings
For me one of the few things that can calm work stress is baking...and I've pretty much been baking every week! My beautiful friend D was having a birthday dinner and she loves coffee (esp Blue Bottle), so I decided to make her some cupcakes with coffee flavor in them. My boss had just gotten promoted too...two birds with one stone!
The Mini Espresso Cake with Peanut Butter Frosting recipe was from Food Network. I switched out the PB frosting for espresso buttercream by adding cocoa powder and a bit of instant coffee diluted in a teaspoon of hot water to the buttercream.
The cake was super delicious coming out of the oven (as most cakes are!) but I think I overbaked it, so it was a bit dry the next day. The conversion of baking times are so tricky! If I made this again, I would make a loaf, not a cupcake, and omit the cocoa powder from the buttercream, as it was just a touch too sweet.
The white chocolate writing was not too hard - anyone can do it. Melt white chocolate chips *very slowly* in the microwave, place contents in extra strength ziploc bag, snip tiny hole at the tip, and practice your squeeze writing on wax paper.
I've heard about Sprinkles a million times over from my many foodie friends. So when my BFF H brought me a red velvet cupcake from the Sprinkles in Palo Alto, I was very excited to try it. For one thing, I never make red velvet in the kitchen, it's just too messy and I don't like the idea of swallowing a whole bottle of red dye in my batter.
The cake was very very moist and quite possibly, the best red velvet I've ever had in terms of cake. The frosting, however, left much to be desired. It was disgustingly sweet and booo....not cream cheese flavored. I left a lot of it behind (see below)
I still prefer Sibby's, a discussion we will have to save for another day...
... I can do anything better than you! From Annie Get Your Gun, this song has been in my head.
I went to Kara's Cupcakes on Scott Street in San Francisco a few days ago because I was in the mood for some new flavor ideas. Ironically, nothing looked that inspiring - I settled for carrot cake with cream cheese frosting, something I hadn't had in quite some time. It was pretty yummy - the cake was very moist, with a nice punch of sweetness from the raisins. The frosting was much too sweet though.
"What do you think?" said BF. "I think you could make it better." "Yeah," says I. "I think I could. And I will!"
And so we got home, I pulled out my mandarin orange Kitchen Aide that BF had gotten for me last Christmas, and viola! I made better carrot cake cupcakes than Kara's! Say that ten times fast!
And here is the recipe. It's fairly easy and I encourage you to try it when you're in the mood for vegetables for dessert. ;-)
For the cake: 2 cups all-purpose flour 1 1/2 teaspoons ground cinnamon 3/4 teaspoon baking soda 1/4 teaspoon baking powder 4 large eggs 3/4 cup vegetable or canola oil 2 cups granulated sugar 1 teaspoon kosher salt 1 pound carrots, grated medium fine 3/4 cup walnut pieces, coarsely chopped
For the fresh orange cream cheese frosting: 12 ounces cream cheese, softened 2 1/2 cups confectioners' sugar Zest of 1 orange 1/2 pound (2 sticks) unsalted butter, softene 1 teaspoon pure vanilla extract
Procedure
Before you start Position a rack in the center of your oven. Preheat the oven to 350ºF. Butter and flour two 8x2-inch round cake pans. Line each pan with an 8-inch round of parchment paper.
To make the cake
1. in a medium bowl, whisk together the flour, cinnamon, baking soda, and baking powder.
2. In the bowl of an electric mixer fitted with the whip attachment, beat the eggs at high speed until light and frothy, about 1 minute. Decrease the speed to medium and add the oil, sugar, and salt, and mix until just combined. Decrease the speed to low and add the flour mixture, mixing until just combined.
3. Remove the bowl from the mixer. Using a rubber spatula, fold in the carrots and walnuts.
4. Divide the batter evenly between the prepared cake pans. Spin the pans to level the batter. Bake for 45 minutes, or until a wooden skewer inserted into the center comes out clean. Remove to a rack to cool for 20 minutes before turning the layers out onto the rack. Cool completely before filling or frosting.
To make the frosting 1. In the bowl of an electric mixer fitted with the paddle attachment, combine the cream cheese, sugar, and zest. Start on low speed and then increase to medium-high speed and beat until smooth, 1 1/2 to 2 minutes. Scrape down the sides of the bowl.
2. Add the butter and mix on medium speed until just fluffy and smooth, about 45 seconds more. Add the vanilla and mix until just combined. Do not overbeat.
To complete the cake
1. Cut 4 strips of wax or parchment paper about 12 inches long by 3 inches wide. Place the bottom cake layer trimmed side up on your serving plate. Tuck the wax paper under the edges of your cake on all sides. Later, after frosting the cake, you can pull away the stripes to reveal a nice clean serving plate.
2. Using a metal offset spatula, spread the filling across the top of the layer, but leave about 1/2 inch uncovered around the outside edges. (This leaves room for the filling to be squished down but to stay inside the cake.)
3. Place the second layer trimmed side down on top of the filling and press down gently with your hands.
4. Apply a light, even layer of frosting on all sides of the cake. Place the cake in the refrigerator to chill for a good 30 minutes.
5. After the crumb coat has chilled, smooth on your final layer of frosting.
The cake keeps in a cake saver in the refrigerator for up to 4 days. It tastes great eaten at room temperature or chilled.
My old coworker is placing a future order in March for her son's 2nd birthday. She's going to have over 60 guests! Hopefully she'll order minis like the ones I made for my little cousin's 4th birthday. I put them in fancy white boxes with clear windows.
Cupcakes from another Christmas order. The client requested cupcakes to look like Christmas tree ornaments. I used candies and butter cream frosting. It took some time to come up with different designs for each cupcake and the execution - lots of colored sugars and food dyes!
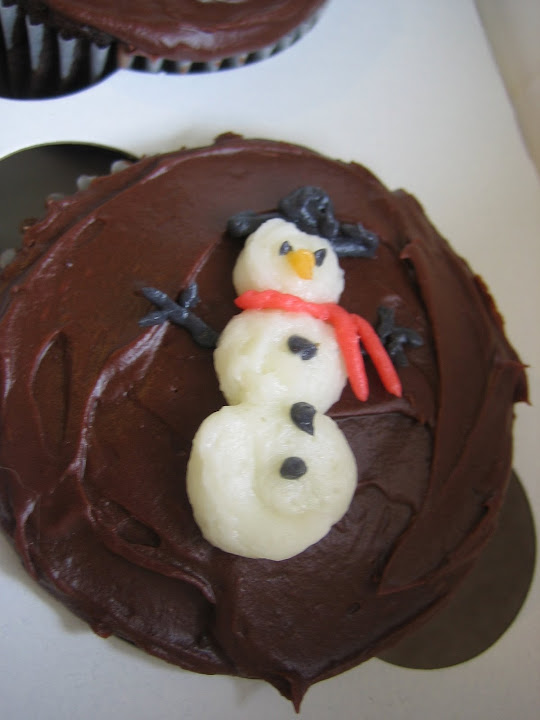
I took some orders over the holidays for Christmas cupcakes. My friends were ordering as gifts for their boyfriend's families. Isn't that sweet?
These were classic chocolate cupcakes with double chocolate frosting. I hand decorated them with butter cream. it was hard work not to shake while squeezing out these little penguins and snowmen!

 hi everyone, long time no see.